Installing HeliOS
In this tutorial, you can learn how to install HeliOS on your computer.
Please select your host specification to get started:
x86_64 PC or laptop, running GNU/Linux (any distro)
arm64 PC or laptop, running GNU/Linux (any distro)
x86_64 PC or laptop, running BSD (FreeBSD, NetBSD, OpenBSD, DragonFly)
arm64 PC or laptop, running BSD (FreeBSD, NetBSD, OpenBSD, DragonFly)
x86_64 (Intel) Mac, running macOS or GNU/Linux (any distro)
arm64 (Apple Silicon) Mac, running macOS
x86_64 PC or laptop, running Windows (8 or later)
arm64 PC or laptop, running Windows (8 or later)
Linux or BSD host
Performing a standard installation on Linux or BSD host
The standard installation can only be done on computers with x86_64 architectures.
For arm64 computers, please see how to run HeliOS in a VM.
When installing HeliOS, you will need the following:
- PC or laptop running GNU/Linux (host)
- Stable internet connection
- USB drive with at least 12 GB of free storage
1. Download the bootable ISO
Download the latest version of HeliOS in a bootable disk image from the HeliOS website.
(Optional) After download, you can verify the downloaded ISO with
cd helios-<build>
md5sum -c helios-<build>.md5
2. Create a bootable installer
Create an install media for booting HeliOS.
A recommended tool for this is balenaEtcher, and this tutorial will be using balenaEtcher.
(You are free to use any of your favorite tools)
(IMPORTANT: balenaEtcher is currently not available for BSDs. Please use dd or a similar tool, which is not included in this tutorial.)
2.1. Download balenaEtcher
balenaEtcher can be downloaded from the Balena homepage.
Please refer to the balenaEtcher documentation.
Alternatively, you can use your distro's package manager:
Debian packages
Download the latest version of balenaEtcher from GitHub.
After download, install the downloaded package with
sudo apt install ./balena-etcher_<version>_amd64.deb
Please refer to the balenaEtcher documentation.
Red Hat packages
Download the latest version of balenaEtcher from GitHub.
After download, install the downloaded package with
sudo yum localinstall balena-etcher-<version>.x86_64.rpm
Please refer to the balenaEtcher documentation.
2.2. Flash your USB drive
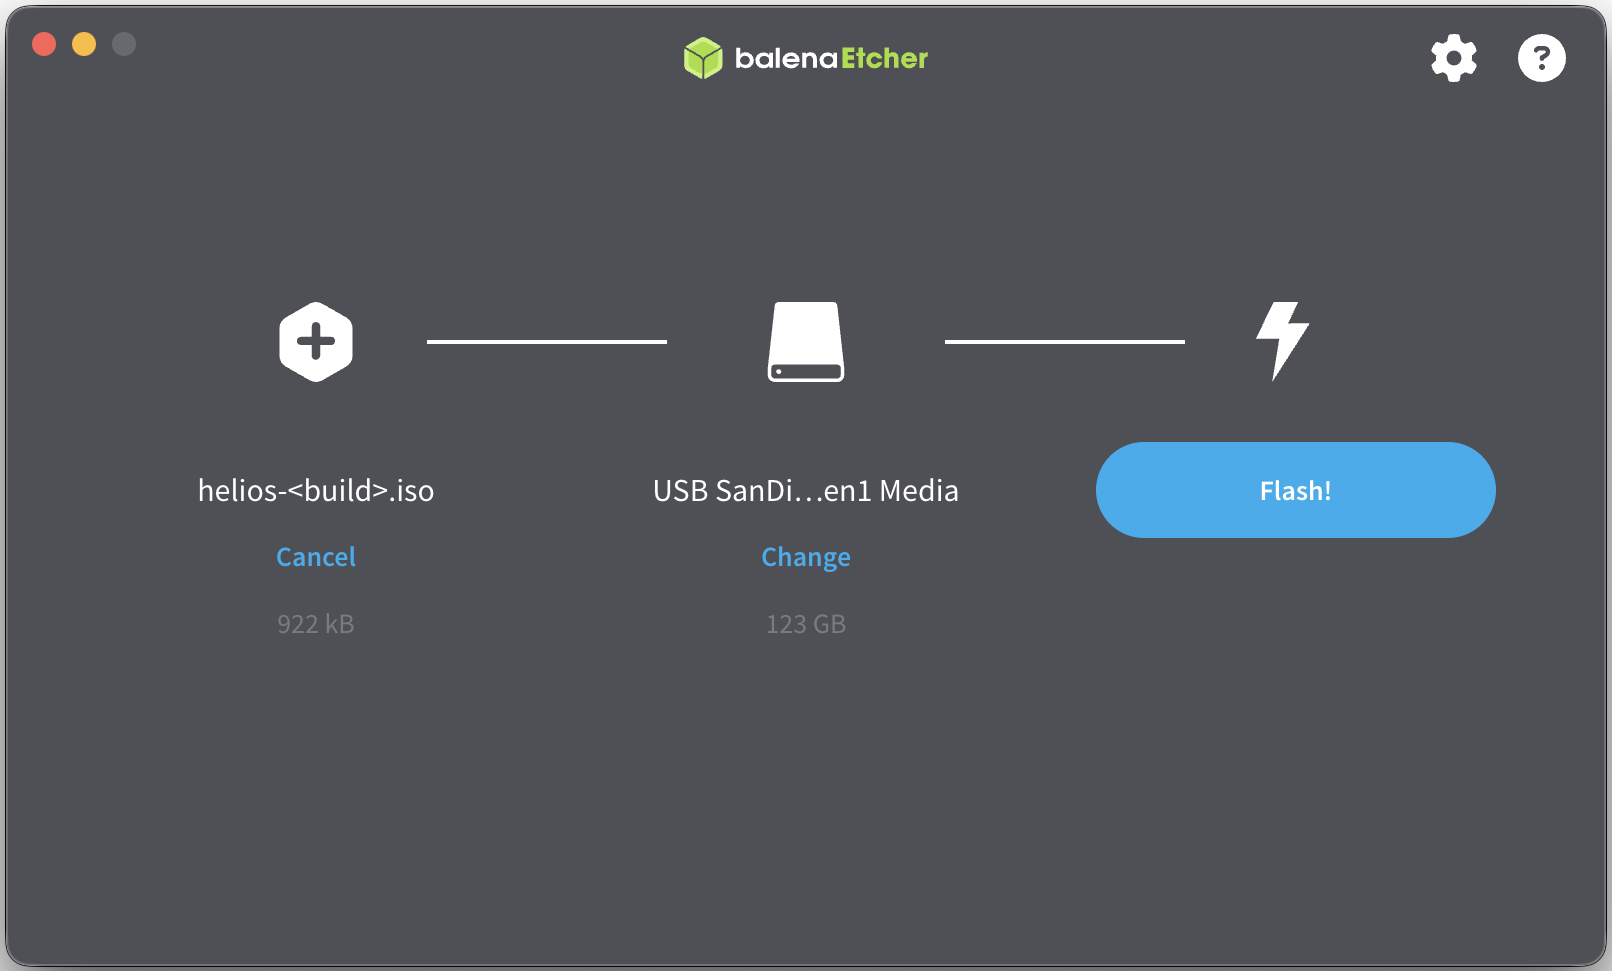
After you have installed balenaEtcher, create an install media for HeliOS by flashing your USB drive using balenaEtcher.
- Select the downloaded
helios-<build>.isodisk image when asked to select a file. - Select your USB drive when asked to select the target to flash.
You should see something like this:
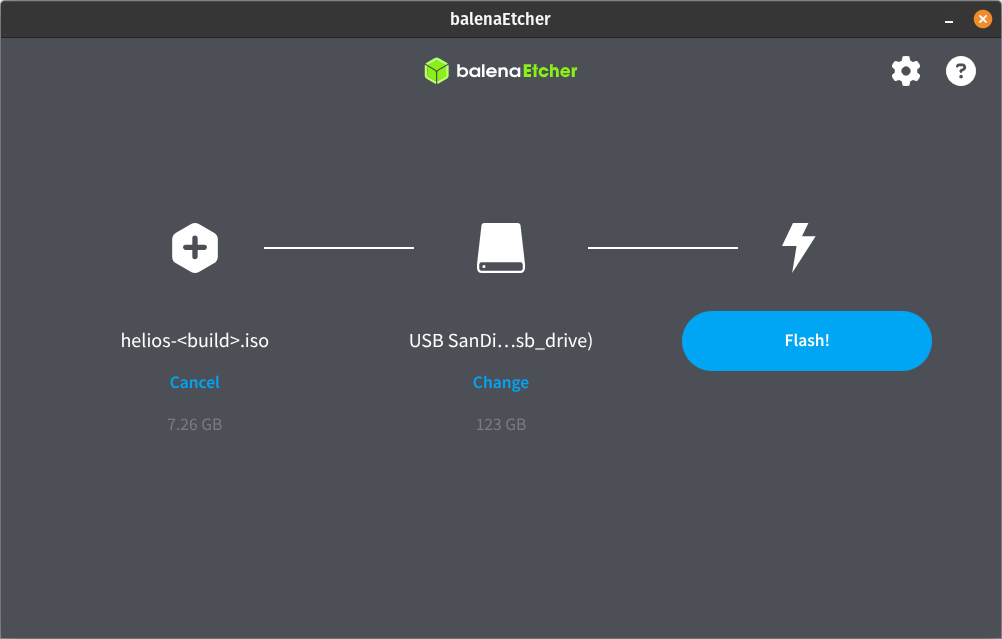
Click "Flash!", and wait for balenaEtcher to finish flashing.
(Note that after flashing, all the data on your drive will be permanently removed)
After balenaEtcher has completed the flashing, you should see something like this:
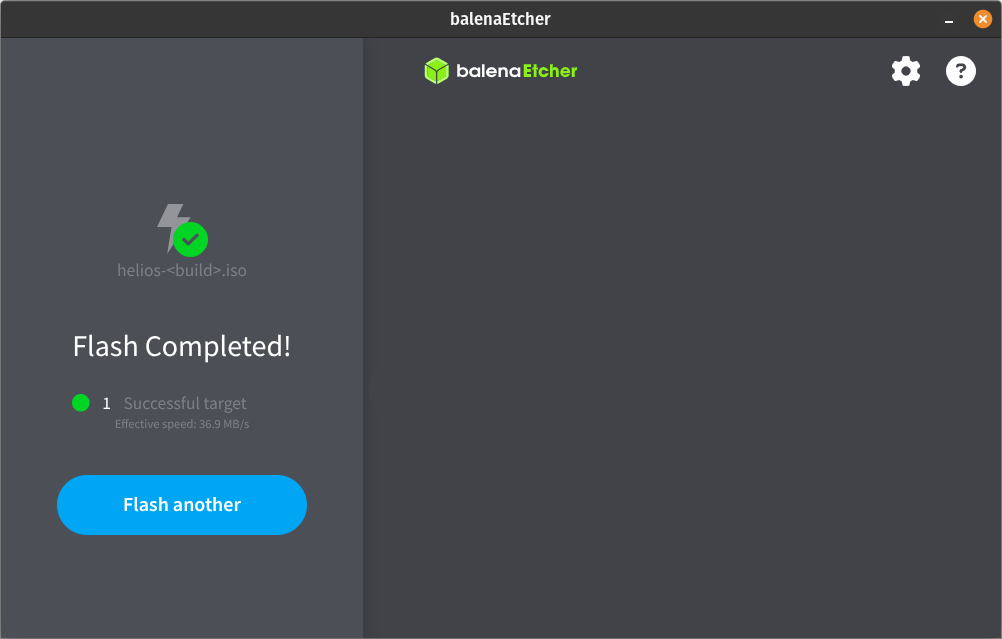
Feel free to quit balenaEtcher now. If everything's good, your freshly flashed USB drive now looks something like this:
HeliOS <build> /
└ boot /
  └ grub /
  └ memtest86+x64.bin
└ casper /
└ dists /
  └ noble /
  └ stable /
  └ unstable /
└ EFI /
  └ boot /
└ install /
└ pool /
  └ main /
  └ restricted /
└ preseed /
  └ ubuntu.seed
└ ubuntu /
└ boot.catalog
└ md5sum.txt
└ README.diskdefines
If everything's good, and your freshly flashed USB drive does look something like that, you can continue with rebooting your computer from your freshly flashed USB drive.
Shut down your computer, and connect your freshly flashed USB drive to it. Depending on your computer, open boot options (most common way is pressing the F12 or the esc key on startup) and make it use your freshly flashed USB drive for booting.
(Tip: disable secure boot and any other scary stuff which could make the installation fail)
After you've successfully rebooted your computer from the install media, the GRUB boot menu will appear, looking like below.
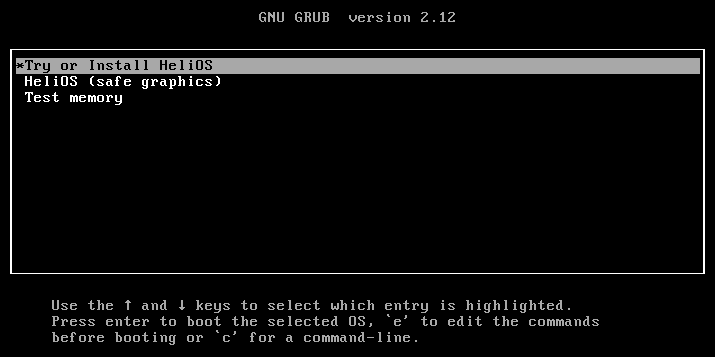
Select the "Try or Install HeliOS" option.
When HeliOS has finished booting, it will open setup utility. Follow the on-screen instructions for installing HeliOS to your system.
FAQ
What to do if balenaEtcher fails to flash my USB drive?
Make sure that the downloaded ISO file isn't corrupted by verifying its checksum. In your terminal, enter
cd helios-<build>
md5sum -c helios-<build>.md5
What to do if setup utility can not install HeliOS correctly?
Press Alt + F2 on your keyboard, and type in gnome-terminal to open terminal. In the terminal, enter
systemctl reboot -i
to reboot your system. This will restart setup utility and will most likely fix this error.
Can I launch HeliOS in a virtual machine?
Yes, see the tutorial for that here.
Running in virtual machine on Linux or BSD host
HeliOS can be launched on computers with both x86_64 and arm64 architectures.
For x86_64 computers, virtualization, while for arm64 computers, emulation is recommended to be used.
1. Download the bootable ISO
Download the latest version of HeliOS in a bootable disk image from the HeliOS website.
(Optional) After download, you can verify the downloaded ISO with
cd helios-<build>
md5sum -c helios-<build>.md5
2. Create a VM for HeliOS
This tutorial will use Oracle VirtualBox for running HeliOS in a VM.
(You are free to use any of your favorite tools)
2.1 Install Oracle VirtualBox
Oracle VirtualBox can be downloaded from the VirtualBox homepage.
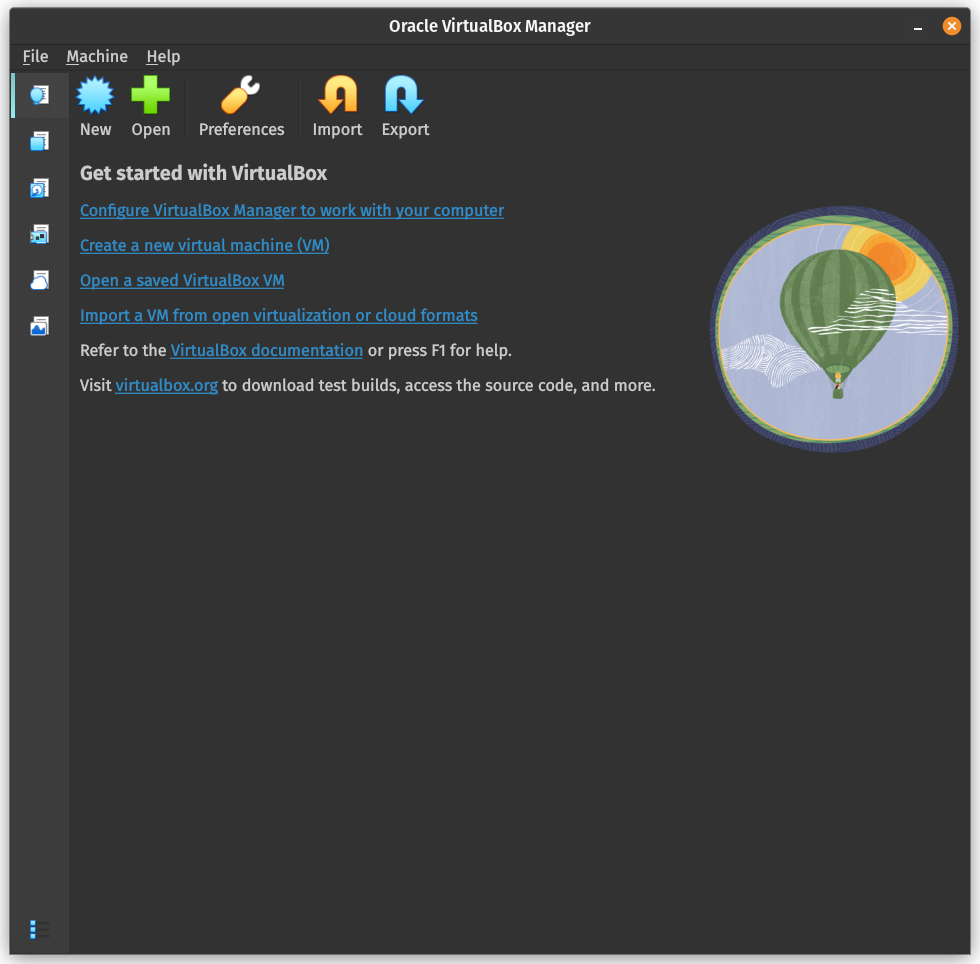
Install the downloaded binary package and open VirtualBox.
You should see something like this after opening:
2.2 Create a VM for HeliOS
On the VirtualBox "Home" tab, click "New" to open the "New Virtual Machine" dialog.
In the "New Virtual Machine" dialog, specify the following:
- VM Name: HeliOS
(or whatever you'd like) - VM Folder: The directory which will be shared between the VM and the host
- ISO Image: Path to the downloaded
helios-<build>.isodisk image - OS: Linux
- OS Distribution: Ubuntu
- OS Version: Ubuntu 24.04 LTS (Noble Numbat) (64-bit)
After setting the right values, your dialog should look something like this:
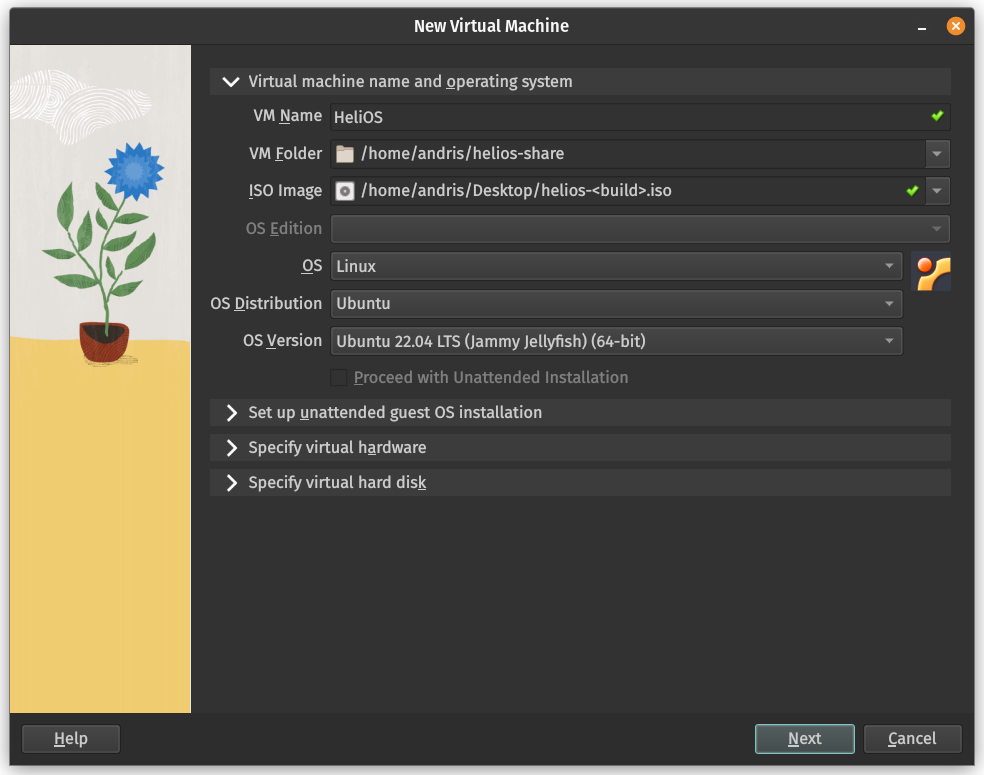
Click "Next" to continue to "Specify virtual hardware".
Here, you can specify the VM's hardware. Resources allocated to the VM will not be available to the host when the VM is running.
Set the following values:
- Base Memory: 4096 MB (4 GB)
- Number of CPUs: 4 or more
- Use EFI:
true
Now your "New Virtual Machine" dialog should look something like this:
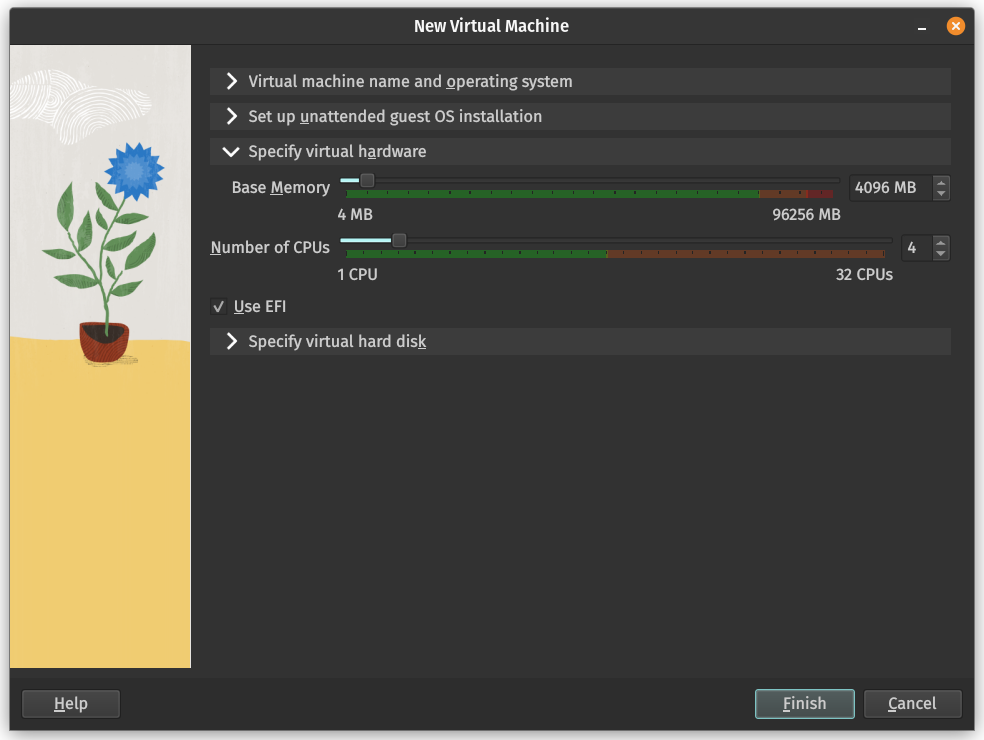
Click "Next" to continue to "Summary".
Make sure that all the above values mach.
Click "Finish" to generate the VM, and launch the VM from the "Home" tab of VirtualBox. After you've successfully launched the created VM, the GRUB boot menu will appear, looking like as seen below.
Select the "Try or Install HeliOS" option to boot HeliOS.
When HeliOS has finished booting, it will open setup utility. Follow the on-screen instructions for setting up HeliOS.
FAQ
What to do if Oracle VirtualBox fails to create a VM for HeliOS?
Refer to the VirtualBox Documentation.
What to do if setup utility outputs an error and fails to install HeliOS?
As its environment is just a VM, this isn't a problem. You can use the "Try out" mode.
With any other errors in connection with setup utility, refer to the Install Ubuntu Desktop tutorial.
macOS host
Performing a standard installation on macOS host
The standard installation can only be done on Intel Macs. For Apple Silicon Macs, please see how to run HeliOS in a VM.
When installing HeliOS, you will need the following:
- Intel Mac running macOS or GNU/Linux (host)
- Stable internet connection
- USB drive with at least 12 GB of free storage
1. Download the bootable ISO
Download the latest version of HeliOS in a bootable disk image from the HeliOS website.
(Optional) After download, you can verify the downloaded ISO with
cd helios-<build>
md5 -c helios-<build>.md5
2. Create a bootable installer
Create an install media for booting HeliOS.
A recommended tool for this is balenaEtcher, and this tutorial will be using balenaEtcher.
(You are free to use any of your favorite tools)
2.1. Download balenaEtcher
balenaEtcher can be downloaded from the Balena homepage.
Please refer to the balenaEtcher documentation.
2.2. Flash your USB drive
After you have installed balenaEtcher, create an install media for HeliOS by flashing your USB drive using balenaEtcher.
- Select the downloaded
helios-<build>.isodisk image when asked to select a file. - Select your USB drive when asked to select the target to flash.
You should see something like this:
Click "Flash!", and wait for balenaEtcher to finish flashing.
(Note that after flashing, all the data on your drive will be permanently removed)
After balenaEtcher is done with the flashing, feel free to close balenaEtcher. If balenaEtcher has completed flashing successfully, your install media now looks something like this:
HeliOS <build> /
└ boot /
  └ grub /
  └ memtest86+x64.bin
└ casper /
└ dists /
  └ noble /
  └ stable /
  └ unstable /
└ EFI /
  └ boot /
└ install /
└ pool /
  └ main /
  └ restricted /
└ preseed /
  └ ubuntu.seed
└ ubuntu /
└ boot.catalog
└ md5sum.txt
└ README.diskdefines
Shut down your Mac either by choosing the "Shut Down" option from the Apple menu, or by pressing and holding the power button until your Mac shuts down.
Connect the created install media to your Mac.
Start your Mac and immediately press and hold the ⌥ (Alt) key on the keyboard to bring up the startup options screen, looking similar to as seen below.
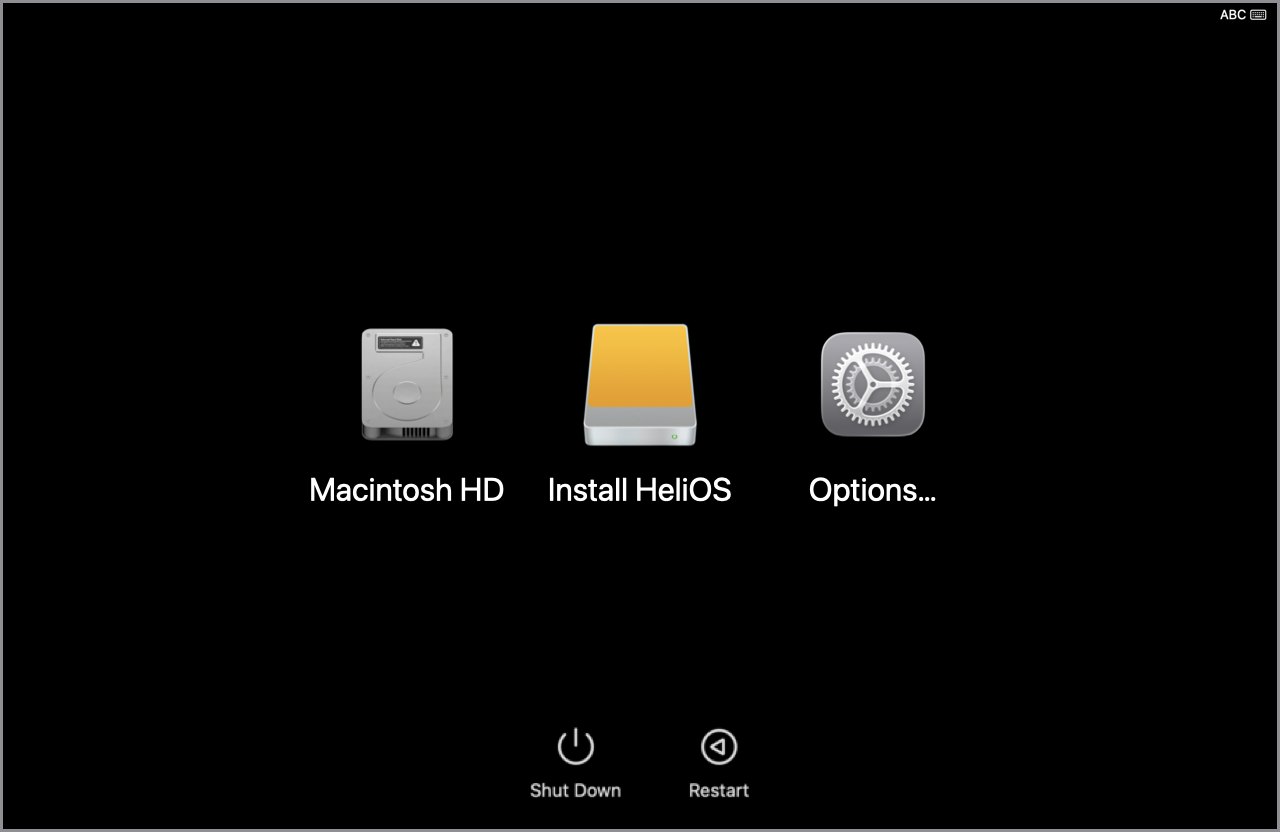
In the startup options screen, select the disk named "Install HeliOS <build>" or "HeliOS <build>".
The GRUB boot menu will appear, looking like this:
Select the "Try or Install HeliOS" option, wait for HeliOS to boot, and follow the on-screen instructions to finalize the installation by setting up your new HeliOS system!
FAQ
What to do if balenaEtcher fails to flash my USB drive?
Make sure that the downloaded ISO file isn't corrupted by verifying its checksum. In your terminal, enter
cd helios-<build>
md5 -c helios-<build>.md5
What to do if setup utility can not install HeliOS correctly?
Press Alt + F2 on your keyboard, and type in gnome-terminal to open terminal. In the terminal, enter
systemctl reboot -i
to reboot your system. This will restart setup utility and will most likely fix this error.
Can I launch HeliOS in a virtual machine?
Yes, see the tutorial for that here.
Running in virtual machine on macOS host
HeliOS can be launched on Macs with both Intel and Apple Silicon processors.
For Intel Macs, virtualization, while for Apple Silicon Macs, emulation is recommended to be used.
(on Intel Macs, both emulation and virtualization can be used)
(on Apple Silicon Macs, only emulation can be used)
1. Download the bootable ISO
Download the latest version of HeliOS in a bootable disk image from the HeliOS website.
(Optional) After download, you can verify the downloaded ISO with
cd helios-<build>
md5 -c helios-<build>.md5
2. Create a VM for HeliOS
UTM is the recommended tool for creating a VM for HeliOS on macOS.
(feel free to use any of your favorite tools)
2.1. Download and install UTM
UTM can be downloaded from the UTM homepage in a DMG image.
After downloading the disk image and mounting it, copy UTM.app to the /Applications directory (global installation). For local installation, copy the app to /Users/<you>/Applications
For more info, visit the UTM documentation.
2.2. Set up the VM
Open UTM.app on your Mac. The main window, similar to below, should appear.
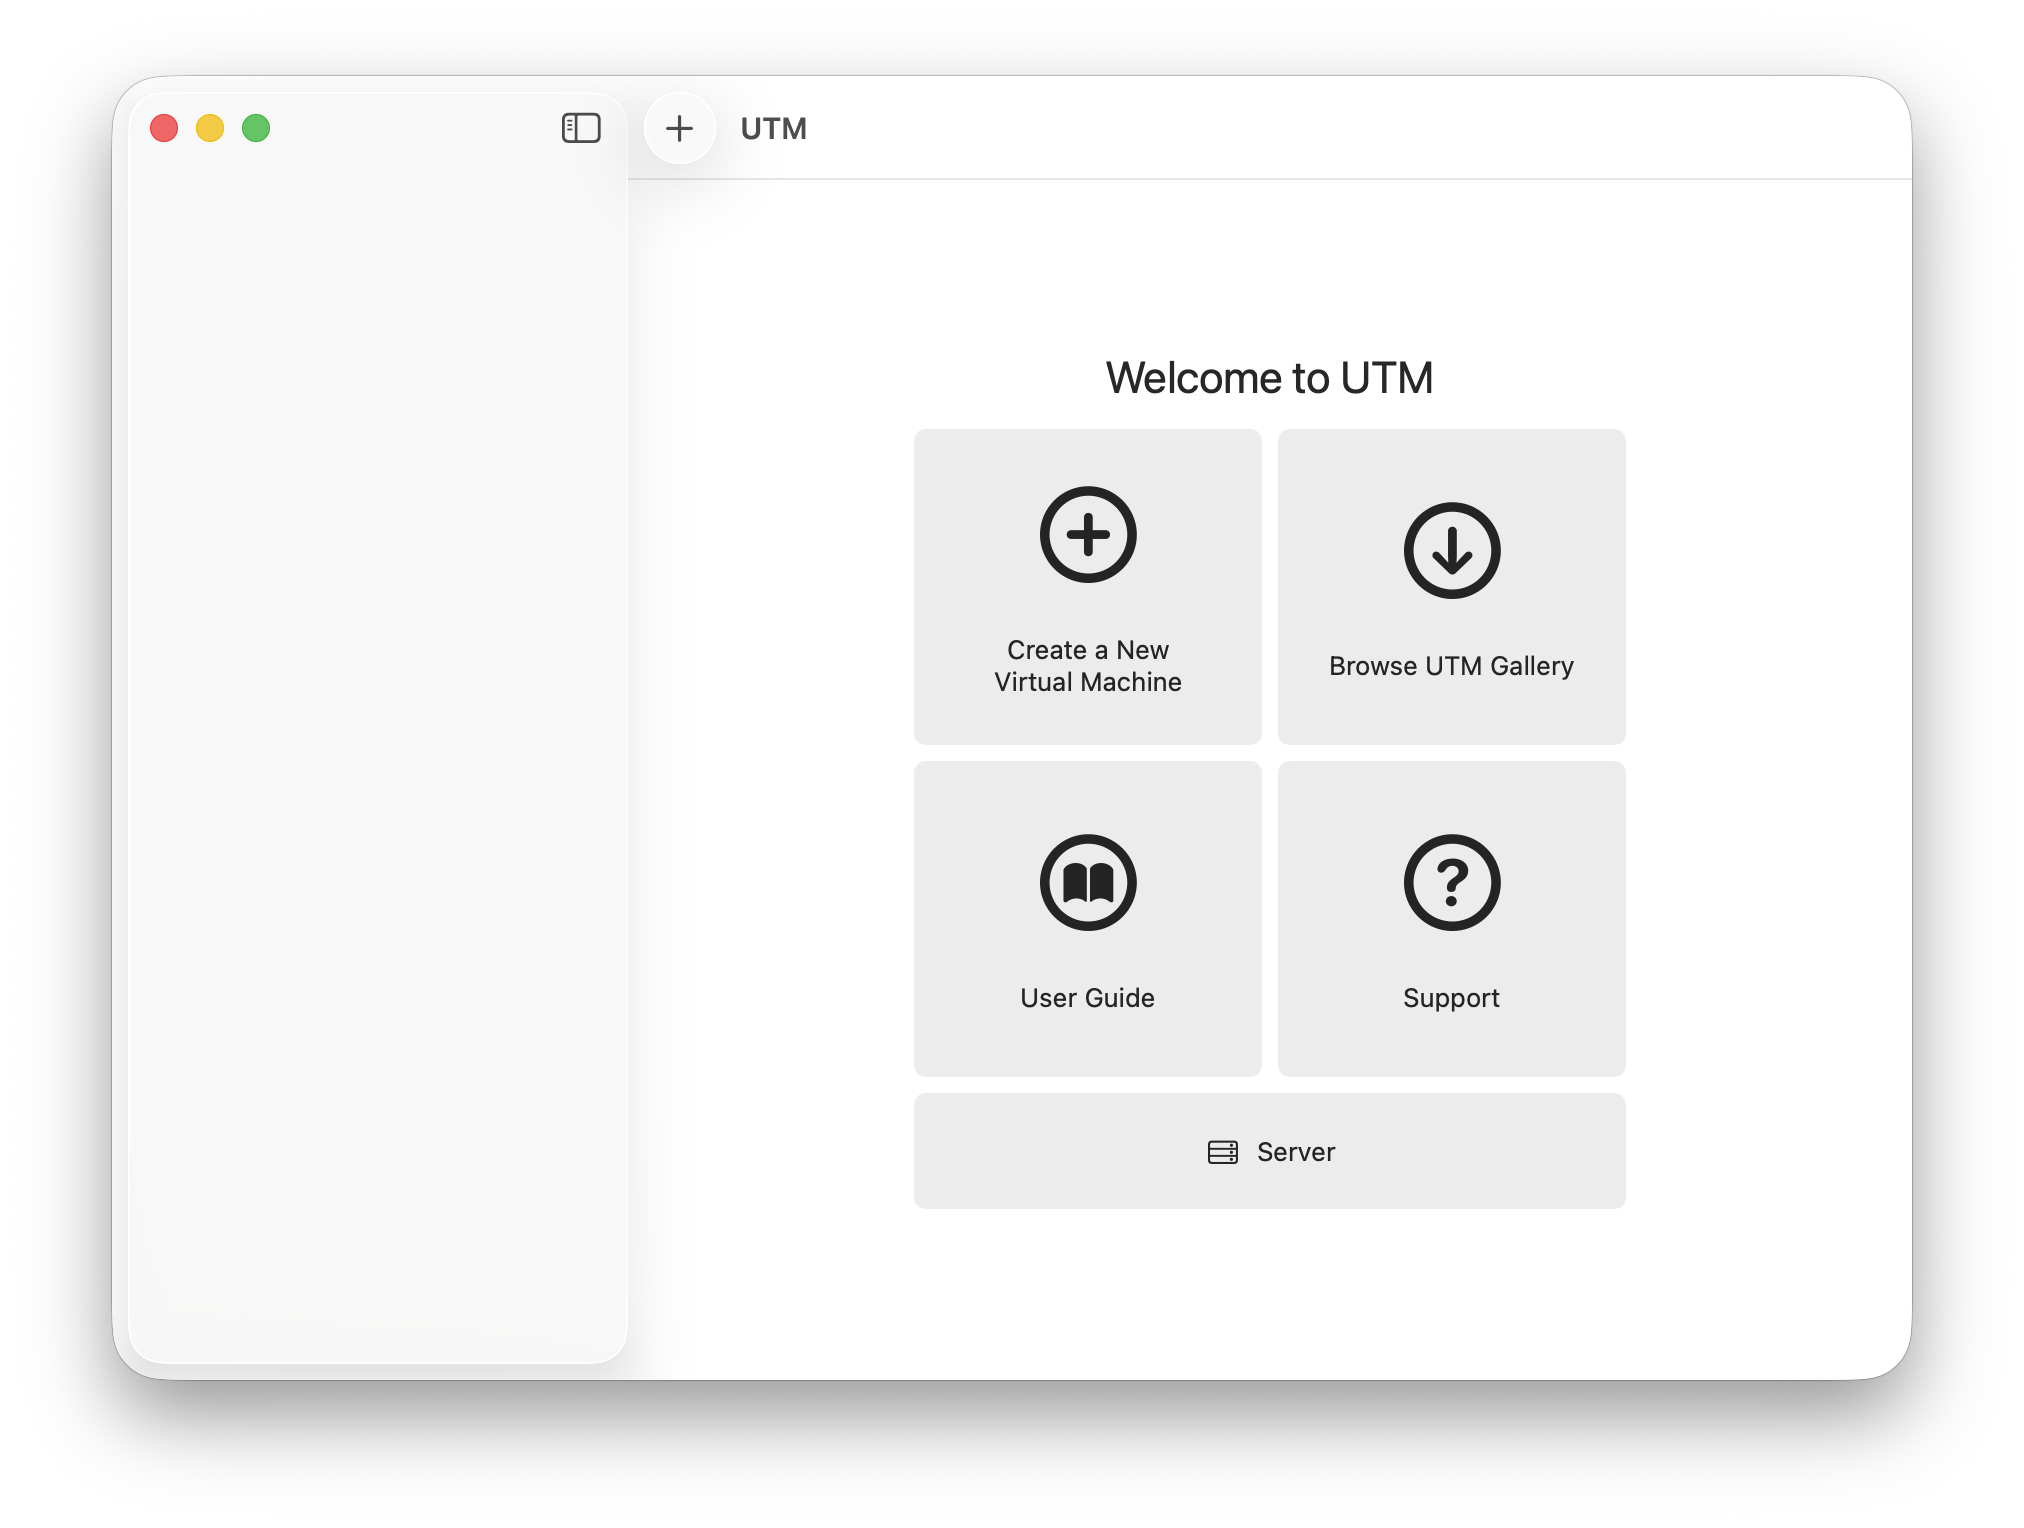
Select the "Create a New Virtual Machine" option. In the "Start" dialog, select the following:
- If you're on an Apple Silicon Mac, select "Emulate"
- If you're on an Intel Mac, you can select both, but the "Virtualize" option is recommended
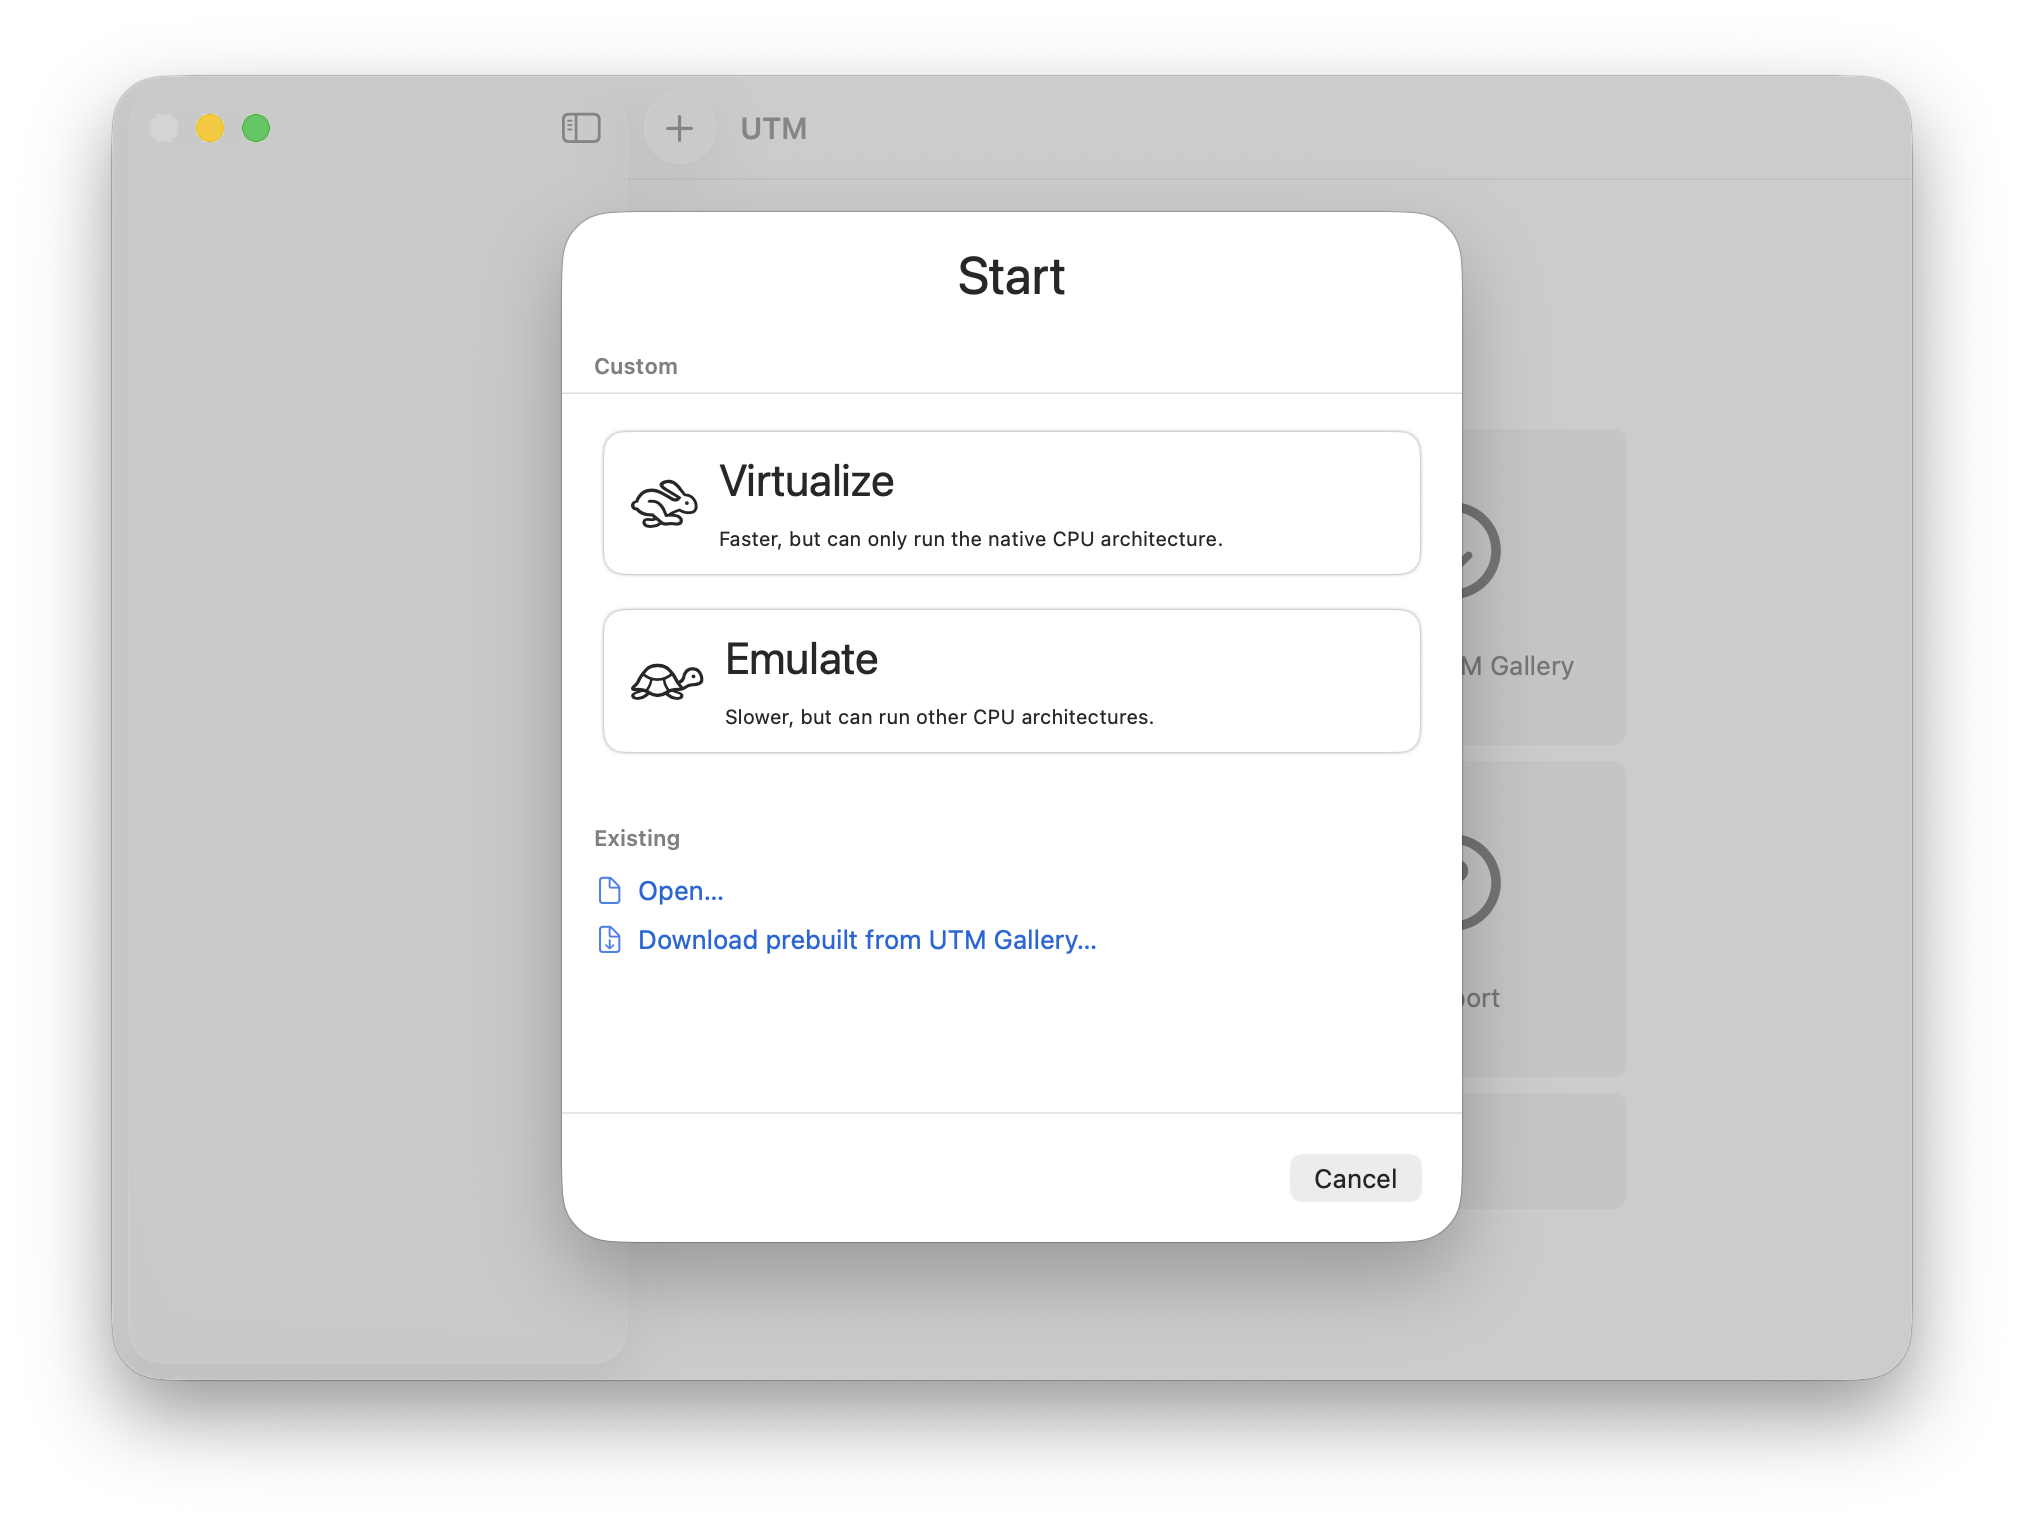
Click continue to specify the operating system. Select the "Linux" option under "Preconfigured".
In the "Hardware" dialog, specify the following values, as shown below:
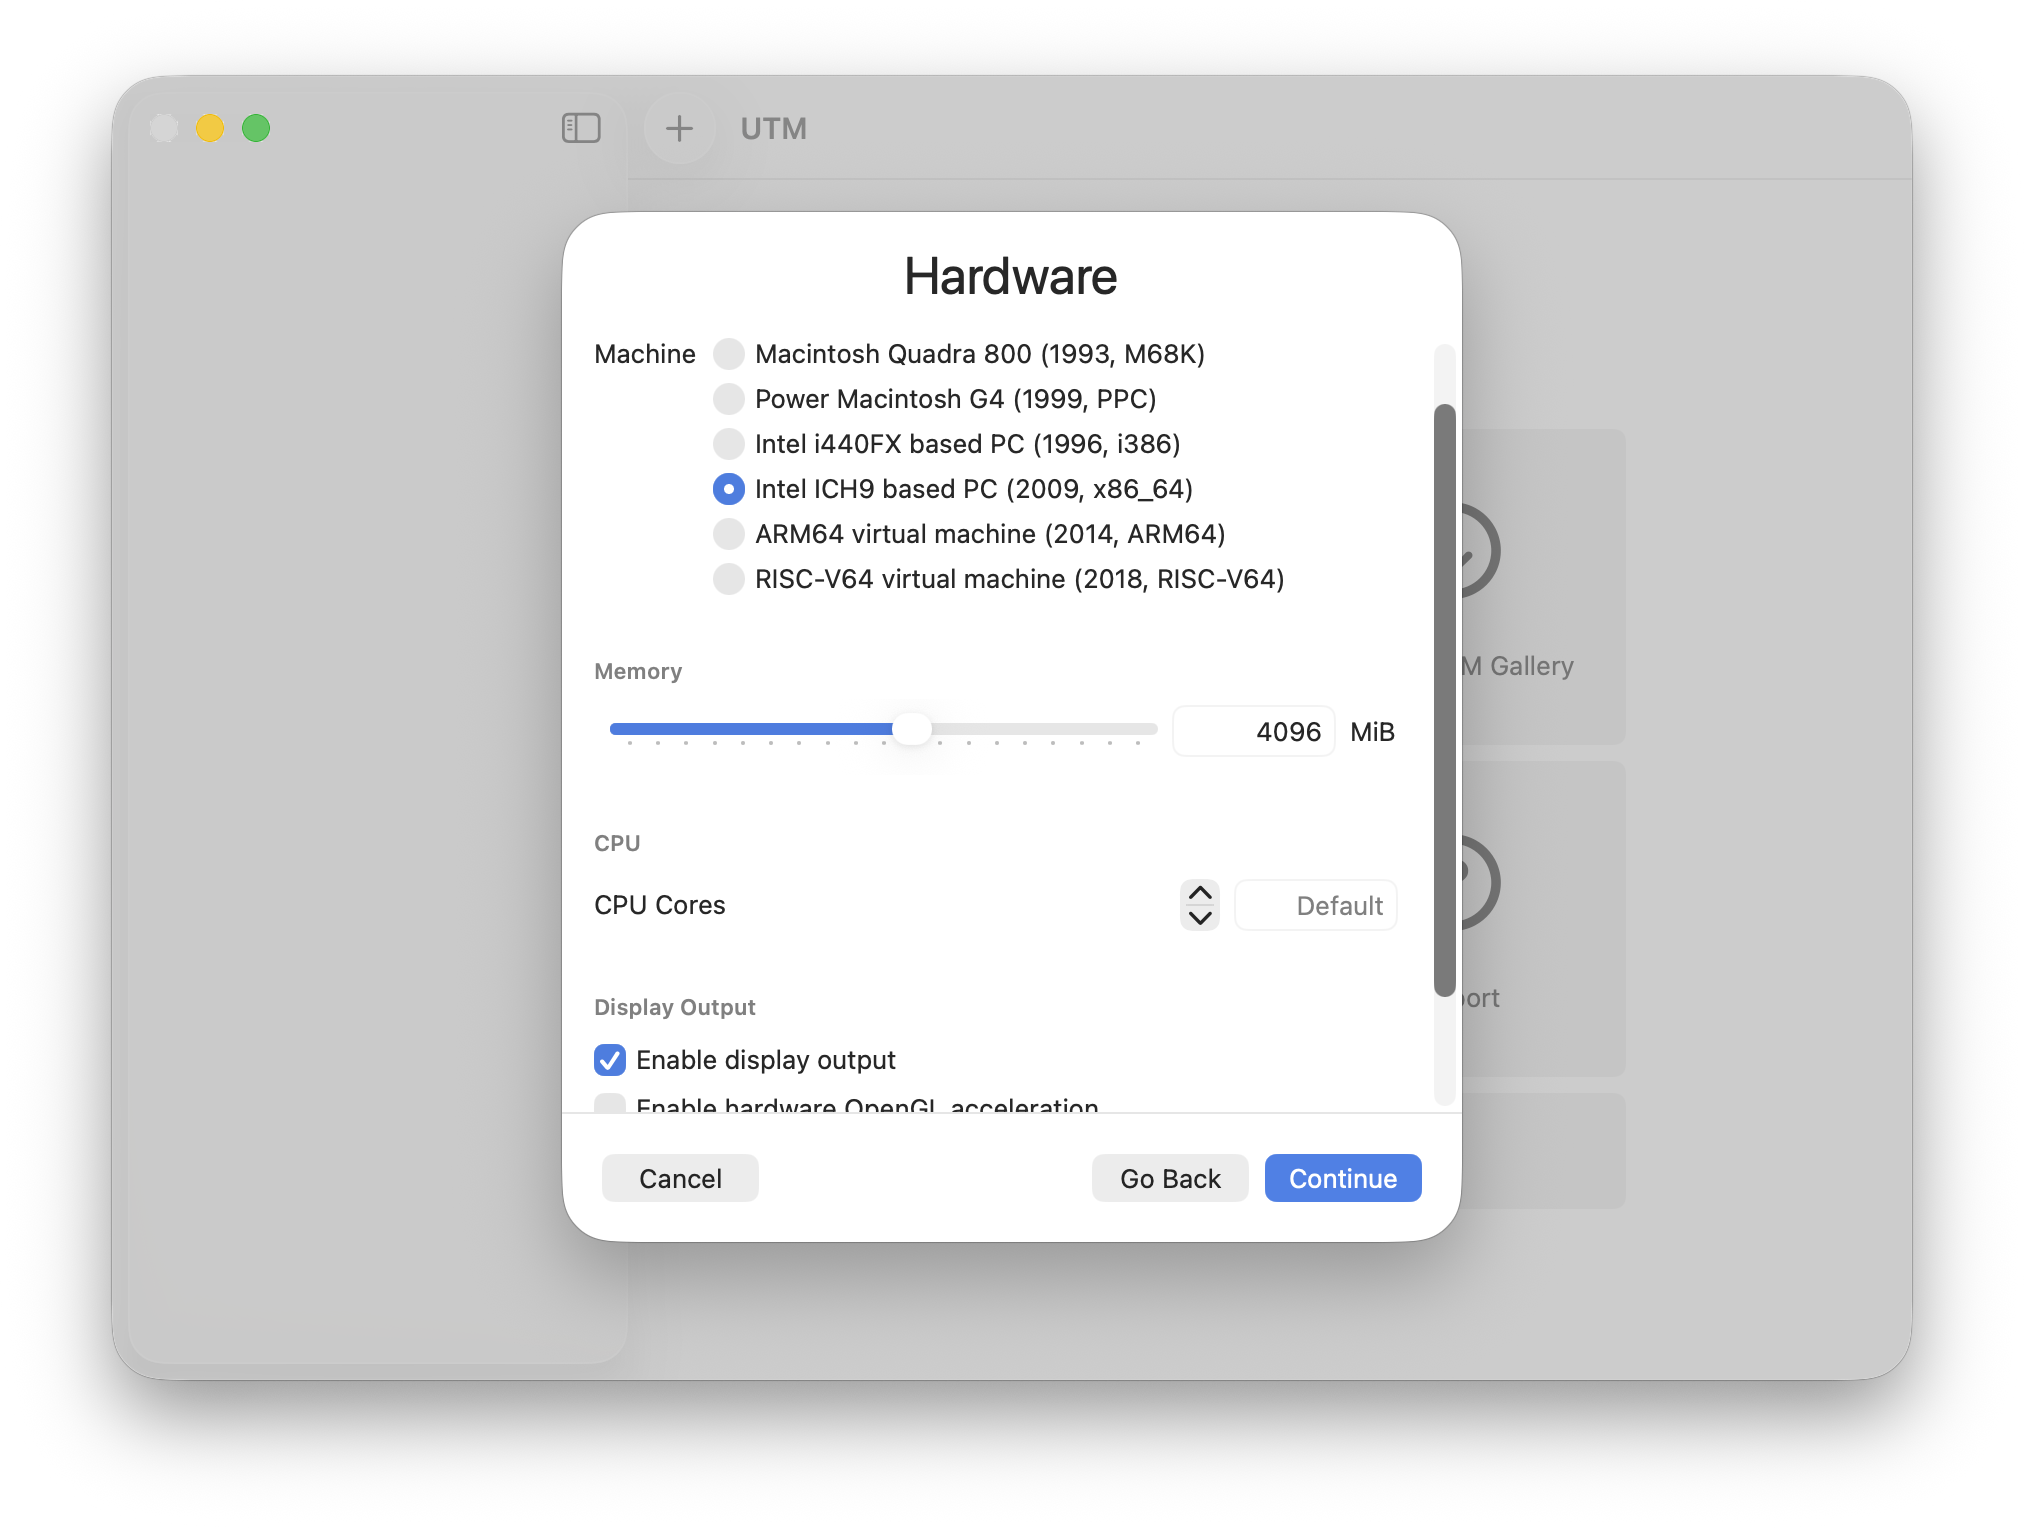
Setup for emulation is shown on image above.
- Machine (if emulation is being set up; not required for virtualization)
- Intel ICH9 based PC (2009, x86_64)
- Memory: 4096 MiB (only modify this if you know what you're doing!)
- CPU Cores: Default
- Enable display output:
true
Click "Continue" to set up the ISO image source (dialog titled "Linux").
Set the following values:
- Boot Image Type: Boot from ISO image
- Boot ISO Image
- Path: (Absolute path to
helios-<build>.iso)
- Path: (Absolute path to
Click continue to run the created virtual machine.
After the VM has successfully launched, the GRUB boot manager appears, looking like this:
In the GRUB boot menu, select the "Try or Install HeliOS" option.
After HeliOS has successfully booted, the setup utility will open. Follow the on-screen instructions to finalize the installation.
FAQ
What to do if UTM fails to create a VM for HeliOS?
Refer to the UTM documentation.
What to do if setup utility outputs an error and fails to install HeliOS?
As its environment is just a VM, this isn't a problem. You can use the "Try out" mode.
With any other errors in connection with setup utility, refer to the Install Ubuntu Desktop tutorial.
Windows host
Documentation for Windows host has not yet been written. Please contribute!
Please note that any images shown in the tutorial above may be outdated, or show outdated information.
If you find this documentation incomplete, outdated, or inaccurate, please contribute!